Components on the server (6): adding Integration Testing

In this installment of the server-side OSGi series, we add integration testing capabilities to our project. Integration testing goes beyond plain unit testing and checks the interactions between real components. This is in contrast with unit testing, which generally uses mockups to represent components outside the one being tested. Please take a look at previous installments, as usual.

In the case of integration testing, it is manly used in a pre-production environment, with a valid build that has all unit tests passed. It can even be used in production to just after a deployment is made, taking care not to have destructive checks or massive load tests in the integration test code. YMMV.

To achieve integration testing we need to check the various OSGi components deployed interact in the way that is expected of them. Therefore we need to test the components in a group and not in isolation. To do that in the OSGi world means we need to have access to the OSGi context from within the tests to access services, call them and check their responses, etc.

To allow for this kind of integration testing within the OSGi environment, we make a slight modification to the excellent test.extender we have already patched in the previous installment.

Basically, the basic test.extender seeks out any JUnit test classes within the fragment bundle, creates an instance using an empty constructor and then fires up the tests. This is activated either by default when the fragment is loaded or by using ‘test ‘ in the console. For further information please see the previous post about this subject.

For our integration testing, we add an extra command to test.extender:

public Object _integrationTest(CommandInterpreter intp) {
        String nextArgument = intp.nextArgument();
    	testExtender.integrationTest(Long.parseLong(nextArgument));
    	return null;
}

And we refactor the TestExtender to add the integrationTest method which reuses some of the code to instantiate test cases using a constructor that accepts the OSGi context as a parameter.

Constructor[] constructors = clazz.getConstructors();
boolean foundConstructor = false;
for (int i = 0; i < constructors.length && !foundConstructor; i++) {
	Constructor constructor = constructors[i];
	Class[] types = constructor.getParameterTypes();
	if (types.length==1 && types[0].isInstance(context)) {
		foundConstructor = true;
		EClassUtils.testClass(inspectClass, constructor.newInstance(context));
	}
} // for

The OSGi context is passed onto the constructor and then the test class is run. It is obviously up to the test class to use the context appropriately for its integration testing.

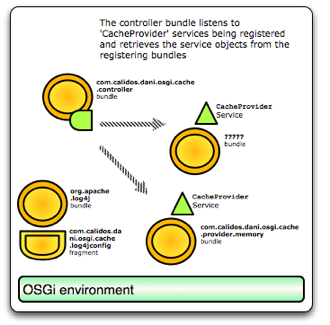
In our cache project setup, we can do some useful integration testing on the cache.controller component, basically checking if the interaction with the provider components is behaving as we expect it. The integration testing is also added to a fragment that can be deployed optionally, of course.

We start by creating the fragment and adding a testing class like this:

Adding test class

Next, we add the constructor that accepts an OSGi context, which is very simple:

public CacheIntegrationTest(BundleContext ctx) {
	super();
	this.context = ctx;
}

In the setup and teardown methods we get and unget the cache service to perform the testing:


public void setUp() throws Exception {
	serviceReference = context.getServiceReference(Cache.class.getName());
	controller = (CacheControllerCore) context.getService(serviceReference);

}

public void tearDown() throws Exception {		
	context.ungetService(serviceReference);
	controller = null;		
}

In this case we get the controller cache service and store it in an instance used to perform the tests. This is quite simple and fulfills our intended purpose but we still have the flexibility to make more complex integration testing if needed.

Next we create as many test cases as needed:

public void testGet() {
	try {
		controller.init();
		double v = Math.random();
		String k = "/k"+v;
		controller.set(k, v);
		assertEquals(v, controller.get(k));
	} catch (CacheProviderException e) {
		e.printStackTrace();
		fail(e.getMessage());
	}

}

It should be noted that while the code looks like regular testing code, it is actually using real services from the OSGi environment as opposed to mockups. This means we are testing the real integration between components as well as the individual controller component code. The disadvantage here is that if there is an error in the controller we might mistake the problem with an issue with the services used. In conclusion, having integration code doesn’t negate the need to have unit tests.

Once we load the fragment onto the environment, first we need to obtain the bundle id of the integration fragment and then launch the integration testing in this manner:


osgi> integrate 125
Bundle : [125] : com.calidos.dani.osgi.cache.controller.integration
_
CLASS : [com.calidos.dani.osgi.cache.controller.CacheIntegrationTest]
___________________________________________________________________________
Method : [ testInit ] PASS
Method : [ testInitInt ] PASS
Method : [ testSize ] PASS
14:21:43,077 WARN CacheControllerCore Couldn't clear some of the provider caches as operation is unsupported
Method : [ testClear ] PASS
Method : [ testSet ] PASS
Method : [ testGet ] PASS
Method : [ testGetStatus ] PASS
___________________________________________________________________________

The results tell us that all operations are OK but we need to bear in mind that the clear operation is not supported in some backend caches. If this is what is expected by the operator then all is fine.

We take advantage of the new integration testing functionality to make some extensive changes to logging and exception handling of the controller code. By running the integration tests we make sure all seems to work fine (even though we still need some proper unit testing of the controller). Modifications are made quite quickly thanks to the integration tests.

To recap, we’ve added integration testing support to the existing ‘test.extender’ bundle and created integration testing code for the cache controller component. This has allowed us to make code changes quickly with less risk of mistakes.

Here you can find a patch for the test extender project as well as the patched testing bundle already compiled. Enjoy!

Components on the server (5): better Unit Testing

In this installment of the OSGi series, we add more complete Unit Testing support in the project. We also establish that some behaviour of the Servlet Bridge may not be what we want and then provide a way to customize it.

Continue reading “Components on the server (5): better Unit Testing”

Components on the server (4): adding Tomcat support

In this post, we examine what is needed to deploy OSGi in a regular Servlet Container using the Equinox Servlet Bridge. We also use the Servlet Bridge to deploy our OSGi cache using Tomcat and wrap it up all together in a standalone WAR archive.

Please read the previous installments to get up to speed and see the source used in this post.

Firstly, we need to setup some kind of project to hold all that is going in the WAR archive. This can be done using the WTP (Web Tools Project) or just as a regular project.

In this case we do it using a plain-vanilla resource project but feel free to use WTP as the basics are the same.

So firstly we create a resources project to hold the stuff, named ‘com.calidos.dani.osgi.cache.package’ for instance.
Secondly, we create the folder structure we need to hold all the files that need to reside in the final WAR webapp, so we create a WEB-INF folder to hold all the classes, libraries metadata and configuration.

We also know we need a web.xml file to define all the servlets this webapp declares. This is where the Equinox Servlet Bridge kicks in. It provides a Servlet that loads up the environment as well as forwards any HTTP requests onto our OSGi-managed Servlet instances.

We check the Equinox in a servlet container article and learn what the bridge Servlet is called, what parameters it can take and any other web.xml details we need.

For instance, we declare that the webapp service class is our BridgeServlet class:

<servlet-class>org.eclipse.equinox.servletbridge.BridgeServlet</servlet-class>
<init-param>
<param-name>commandline</param-name>
<param-value>-console</param-value>
</init-param>
<init-param>
<param-name>enableFrameworkControls</param-name>
<param-value>true</param-value>
</init-param>

We also add two parameters (more information and additional options can be found on the FrameworkLauncher servlet bridge class and the Equinox documentation).

Next, we need this special servlet itself. I prefer to check out the servlet from CVS and compile it myself but you can also find it here (from the the Latest Release pick up the org.eclipse.equinox.servletbridge jar). In the case of using the source, the CVS connection data is the following:


Method: pserver
User: anonymous
Host: dev.eclipse.org
Repository path: /cvsroot/rt
CVS Module: org.eclipse.equinox/server-side/bundles/org.eclipse.equinox.servletbridge

Once we import the project into Eclipse it looks like this:

Servlet bridge project

As we can see, there are just three classes which compose the servlet, a special classloader and finally a class that launches OSGi.

If we import the project into our workspace, we have compiled classes in the bin/ folder of the project but we really want them neatly packaged as a jar file. Therefore, we right-click on the project to export as a JAR java package:

Servlet bridge JAR export

We take this JAR archive and save it in our package project WEB-INF/lib folder. We also check the composition of the file to make sure it includes all the classes we need.

This takes care of the plain webapp side of things so we move onto actually loading OSGi and what configuration it needs.

As mandated by Equinox we add a launch.ini file to clear and possibly override System properties (please see the source for details on that).

We then create an eclipse folder, which the servlet bridge expects to find the OSGi platform jar and any bundles (including ours).

We select all our project bundles, right-click and select the ‘Export…:Deployable plug-ins and fragments’ option.

This leaves us with a list of bundles that compose our custom code:

com.calidos.dani.osgi.cache.controller_1.0.0.beta.jar
com.calidos.dani.osgi.cache.frontend.http_1.0.0.beta.jar
com.calidos.dani.osgi.cache.log4jconfig_1.0.0.beta.jar
com.calidos.dani.osgi.cache.provider.memcached_1.0.0.beta.jar
com.calidos.dani.osgi.cache.provider.memory_0.0.1.dev.jar

Good, as we know, there are some standard and some special bundle dependencies we need as well. Let’s go through them by groups. We get a bunch of basic OSGi bundles we should include in most projects:

org.eclipse.equinox.registry_3.4.100.v20090520-1800.jar
org.eclipse.osgi.services_3.2.0.v20090520-1800.jar
org.eclipse.osgi.util_3.2.0.v20090520-1800.jar
org.eclipse.osgi_3.5.1.R35x_v20090827.jar

There are several options to obtain these bundles:

For expediency, we can go to our Eclipse installation folder and look for them in the ‘plugins’ subfolder. We then copy them into our package ‘plugins’ folder and there you go.

The second option is to get them from the Equinox distribution.

Another option is to the prepackaged servlet bridge feature which can be picked from CVS as well:

Method: pserver
User: anonymous
Host: dev.eclipse.org
Repository path: /cvsroot/rt
CVS Module: org.eclipse.equinox/server-side/features/org.eclipse.equinox.servletbridge.feature

Once that is loaded onto our workspace, we open the feature.xml and select the ‘Export Wizard’ form the ‘Exporting’ section. This lets us export these minimum bundles and generate both the deployment ‘feature.xml’ file as well as the bundle listing (even though the wizard actually takes them from our Eclipse platform).

We also have some more dependencies related to doing HTTP and the logging platform:

org.apache.log4j_1.2.13.v200903072027.jar
org.eclipse.equinox.common_3.5.1.R35x_v20090807-1100.jar
org.eclipse.equinox.http.registry_1.0.200.v20090520-1800.jar
org.eclipse.equinox.http.servlet_1.0.200.v20090520-1800.jar
org.eclipse.equinox.registry_3.4.100.v20090520-1800.jar

These can also be obtained from the Eclipse plugins folder or Equinox distribution folder. One should note that modifying the feature.xml taken from the Eclipse CVS repository, adding any required plugins there and then running the Export Wizard.

Finally, we have two dependencies we need to pay special attention to:

org.eclipse.equinox.http.servletbridge_1.0.200.200911180023.jar
javax.servlet_2.4.0.200911240836.jar

In the first case, it’s a special minimal bundle that hooks the plain webapp servlet bridge with the OSGi ‘org.eclipse.equinox.http.servlet’ standard component which publishes a servlet service onto the OSGi platform.

This are the details to get it from CVS:

Method: pserver
User: anonymous
Host: dev.eclipse.org
Repository path: /cvsroot/rt
CVS Module: org.eclipse.equinox/server-side/bundles/org.eclipse.equinox.http.servletbridge

We export it as a deployable plug-in and add it to the mix. We can also download it from the Equinox distribution site as well.

In the second case, this bundle contains the basic servlet classes and interfaces and I have found problems of class signatures when using 2.5 along with the servlet bridge so unless all is compiled against 2.5 the safest bet is to go with 2.4.

(Check http://www.eclipse.org/equinox/documents/quickstart.php for more info).

Next, Equinox requires an XML file to define some metadata about the loaded bundles and make our configuration easier. The file sits in a folder called ‘features’ plus a subfolder with a reverse DNS name and is called feature.xml.

The structure is quite simple (though it can be created using the Eclipse Feature Export Wizard) and mainly holds a list of plugins, their version data and some more fields:


We complete the list with all our bundles, fully knowing that we can extend our environment on the fly once it’s loaded if we need it.

Next, we create the config.ini file which really tells equinox which of the bundles stated in the feature file to start, at which start level and lets us add even more bundles (though we need to specify where the actual file is located and the full filename in that case). It also lets us configure the environment pretty thoroughly.

The resulting config.ini file looks like this:


#Eclipse Runtime Configuration File
osgi.bundles=org.eclipse.equinox.common@1:start, org.apache.log4j@start, org.eclipse.osgi.util@start, org.eclipse.osgi.services@start, org.eclipse.equinox.http.servlet@start, \
org.eclipse.equinox.servletbridge.extensionbundle, \
org.eclipse.equinox.http.servletbridge@start, \
javax.servlet@start, org.eclipse.equinox.registry@start, org.eclipse.equinox.http.registry@start, org.eclipse.equinox.servletbridge.extensionbundle \
org.eclipse.equinox.http.servlet@start, org.eclipse.equinox.common@start, com.calidos.dani.osgi.cache.log4jconfig, \
com.calidos.dani.osgi.cache.provider.memcached@3:start, com.calidos.dani.osgi.cache.provider.memory, com.calidos.dani.osgi.cache.controller@4:start, \
com.calidos.dani.osgi.cache.frontend.http@5:start

osgi.bundles.defaultStartLevel=4

We decide not to start the in memory bundle as it only works reliably in a single instance deployment scenario. Otherwise, in a multiple server setup the in-memory cache data would become inconsistent.

Also, be sure to check the Equinox quickstart guide and documentation for more information.

Once all is is done, the project looks like this:

Finished package project

Time to right-click on the project and select ‘Export:Archive file’ to save it in zip format and rename it to .war. Ready to deploy! Remember to access it using the URL //cache/. In web.xml the ‘-console 6666’ parameter means that doing a telnet on port 6666 of the machine initiates a session within the OSGi console. WARNING: there is absolutely NO SECURITY so disable, firewall or ACL that port NOW.

As usual, here you can find the source and the completed WAR though they are one and the same.

Components on the server (3): adding a HTTP frontend

Welcome to the third instalment of our OSGi ABC tutorial. Please make sure you check both the 1st installment and the 2nd.

In this post, we will add another cache provider implementation to the mix as well as provide an HTTP front-end so the whole application can be tested.

First of all, let’s present a conceptual diagram of all the bundles and fragments involved so far.

Components diagram

Read on for more…

Continue reading “Components on the server (3): adding a HTTP frontend”

Components on the server (2): creating the first bundles

Hopefully you enjoyed the OSGi journey in its first installment.

Though simple and easy to understand, the first example does nothing out of the ordinary. It is far more interesting to start exploiting some of the basic features OSGi gets us “for free”.

For instance, we could begin by moving our first basic implementation into a separate “model” bundle and enhancing the interface so it can throw exceptions. For instance, an exception can be thrown when no implementations are available or cannot be contacted/operated.

Read the rest of the post for the implementation details…

Continue reading “Components on the server (2): creating the first bundles”

Experiencing server-side OSGi with Equinox

There is currently a lot of buzz about the OSGi java component technology, also server-side. I have been playing -and working- with this interesting technology recently, mainly the Equinox server-side bundles that allow deployment of an OSGi environment in a java servlet environment.

A fundamental problem that this technology solves is being able to load an OSGi environment on a servlet server. That is a relatively costly operation that needs to be done only once and be persistent on the server in between client requests. After that point, state is maintained and bundles can be deployed and managed as needed. Creating, loading and destroying the environment for each request would just be unacceptable. One interesting functionality is then being able to serve client requests, specially HTTP requests, uploads, provide REST interfaces, etc.

Eclipse provides a number of projects to load the environment, register servlets, handle http requests, etc. Of particular interest is the ‘org.eclipse.equinox.servletbridge’ project, which initally starts the framework, loads the appropriate framework bundles, etc.

Looking at the code, you can start by checking out the main class, which has a number of interesting responsabilities:

/**
 * The BridgeServlet provides a means to bridge the servlet and
OSGi runtimes. This class has 3 main responsibilities:
 * 1) Control the lifecycle of the associated FrameworkLauncher
in line with its own lifecycle
 * 2) Provide a servlet "hook" that allows all servlet requests
to be delegated to the registered servlet
 * 3) Provide means to manually control the framework lifecycle
 */

I personally like classes that have a small set of responsabilities, but one can argue that the three are so related that they are expressions of the same one. The first responsability described is actually managing the lifecycle of the OSGi framework FrameworkLauncher class.

Basically, the Servlet Container will load the bridge web application, create an instance of ServletBridge and call its init method (defined by the HttpServlet interface which it implements). In that method the OSGi environment will be created and loaded by the following code:

framework.init(getServletConfig());
framework.deploy();
framework.start();
frameworkStarted = true;

The attribute ‘framework’ is an instance of the ‘FrameworkLauncher’ class, which encapsulates the OSGi environment management logic. The ‘init’ method pulls information from the servlet configuration (such as the name of the ‘WEB-INF’ folder) and calls an overloaded empty init method that could be exploited by specialised subclasses (more on this later).

After that, the framework is “deployed”. The method in question declares the following contract:

/**
* deploy is used to move the OSGi framework libraries into a location
   suitable for execution.
* The default behavior is to copy the contents of the webapp's
   WEB-INF/eclipse directory to the webapp's temp directory.
*/

And that’s right, the code is quite straightforward and goes along the lines of:

File servletTemp = (File) context.getAttribute("javax.servlet.context.tempdir");
platformDirectory = new File(servletTemp, "eclipse");
if (!platformDirectory.exists()) {
	platformDirectory.mkdirs();
}
File plugins = new File(platformDirectory, "plugins");
copyResource(resourceBase + "plugins/", plugins);

Which copies the bundles you want to deploy onto the OSGi environment onto the Servlet Container temporary folder (the ‘work’ folder in the case of Apache Tomcat).

After that the framework is started, reading .ini configuration options, command line switches, bundle list, run levels and so forth. We have not been able to get bundles started automatically unless we specify the bundle filename, complete with ‘.jar’ extension and all. One interesting option is the ability to fire up a standard OSGi console that uses the STDIN/OUT of the Servlet Container process.

Using the very same servlet bridge, there are a number of URLs that can be hit do control the framework, start, stop, undeploy, etc.

After that, one can register servlets as extension points or listen for services named “org.osgi.service.http.HttpService” and adding servlets with code going along these lines:

public Object addingService(ServiceReference reference) {
	HttpService httpService = (HttpService) context.getService(reference);
	httpService.registerServlet(url, servlet, null, null);
}

All is well and good. However, in working with the bridge code we have found a glitch in the startup code. Whenever the bridge app is started anew, it does the framework deployment and startup as expected but if there are any bundles that have any changes they will not be read by the environment unless the redeploy url is hit. This is fine in development environments but not on production, where you want to keep things  as smooth as possible.

Behold the power of OSS, we took a look at the code and submitted a bug entry complete with a working patch that fixes the problem. It is not pretty but it works (it has some code duplication).

Server-side OSGi is proving to be the place to be, or at least it is quite promising. Give it a try.