Els de Gizmodo ens han regalat una xafarderia un xic inusual… L’Eric Schmidt de Google i el Steve Jobs d’Apple prenent un café en un bar de Palo Alto.
I això que teòricament estaven en “peu de guerra“. Serà que han enterrat la destral…?
A blog by Dani Giribet
Els de Gizmodo ens han regalat una xafarderia un xic inusual… L’Eric Schmidt de Google i el Steve Jobs d’Apple prenent un café en un bar de Palo Alto.
I això que teòricament estaven en “peu de guerra“. Serà que han enterrat la destral…?
From the Firefox for Nokia N900 1.0 release notes themselves, stumbled upon this little gem:
Initially, Firefox for N900 does not support browser plug-ins. Due to performance problems using Adobe Flash within Firefox on many websites, especially those with multiple plug-ins on them, we have disabled plugins for Firefox for Maemo 1.0. We plan to provide a browser add-on that will enable you to selectively enable plugins on certain sites, because some sites, like YouTube, work well.
So the good folks of the Mozilla Foundation have gone and released the thing. Given the recent turn of events, it’s interesting to see the reality brick hitting the Adobe head, so to speak. Couldn’t think of a more appropriate support for the Apple iPad, really.
Even if the eventually release it with plug-in support enabled, they will probably stick with letting users enable Flash selectively… This is yet another nail in the Flash coffin.
Article boníssim sobre el disseny d’interfícies i l’impacte de qualsevol decisió de disseny sobre l’usabilitat.
Ens parla dels compromisos inherents en qualsevol decisió de disseny. També del mal que pot fer el disseny d’aplicacions en un comité on tothom hi diu la seva. També planteja la idea d’objectivar les decisions que es prenguin i construïr si cal una taula amb les avantatges i les consequències de cadascuna de les decisions.
Lectura obligada si ens dediquem al disseny i conceptualització de productes. Bookmark afegit.
In this installment of the OSGi series, we add more complete Unit Testing support in the project. We also establish that some behaviour of the Servlet Bridge may not be what we want and then provide a way to customize it.
Continue reading “Components on the server (5): better Unit Testing”
Fent unes reescoltes he trobat aquest genial remake del clàssic ‘Monster’ dels galesos The Automatic. Genial!
In this post, we examine what is needed to deploy OSGi in a regular Servlet Container using the Equinox Servlet Bridge. We also use the Servlet Bridge to deploy our OSGi cache using Tomcat and wrap it up all together in a standalone WAR archive.
Please read the previous installments to get up to speed and see the source used in this post.
Firstly, we need to setup some kind of project to hold all that is going in the WAR archive. This can be done using the WTP (Web Tools Project) or just as a regular project.
In this case we do it using a plain-vanilla resource project but feel free to use WTP as the basics are the same.
So firstly we create a resources project to hold the stuff, named ‘com.calidos.dani.osgi.cache.package’ for instance.
Secondly, we create the folder structure we need to hold all the files that need to reside in the final WAR webapp, so we create a WEB-INF folder to hold all the classes, libraries metadata and configuration.
We also know we need a web.xml file to define all the servlets this webapp declares. This is where the Equinox Servlet Bridge kicks in. It provides a Servlet that loads up the environment as well as forwards any HTTP requests onto our OSGi-managed Servlet instances.
We check the Equinox in a servlet container article and learn what the bridge Servlet is called, what parameters it can take and any other web.xml details we need.
For instance, we declare that the webapp service class is our BridgeServlet class:
<servlet-class>org.eclipse.equinox.servletbridge.BridgeServlet</servlet-class>

<init-param>

	<param-name>commandline</param-name>

	<param-value>-console</param-value>

</init-param>

<init-param>

	<param-name>enableFrameworkControls</param-name>

	<param-value>true</param-value>

</init-param>
We also add two parameters (more information and additional options can be found on the FrameworkLauncher servlet bridge class and the Equinox documentation).
Next, we need this special servlet itself. I prefer to check out the servlet from CVS and compile it myself but you can also find it here (from the the Latest Release pick up the org.eclipse.equinox.servletbridge jar). In the case of using the source, the CVS connection data is the following:
Method: pserver

User: anonymous

Host: dev.eclipse.org

Repository path: /cvsroot/rt

CVS Module: org.eclipse.equinox/server-side/bundles/org.eclipse.equinox.servletbridge
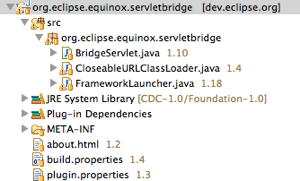
Once we import the project into Eclipse it looks like this:

As we can see, there are just three classes which compose the servlet, a special classloader and finally a class that launches OSGi.
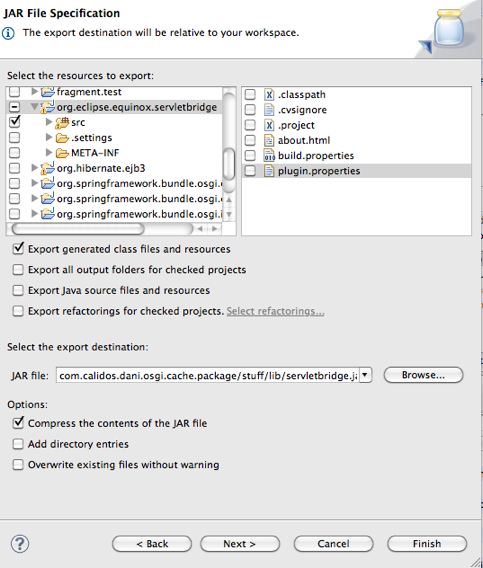
If we import the project into our workspace, we have compiled classes in the bin/ folder of the project but we really want them neatly packaged as a jar file. Therefore, we right-click on the project to export as a JAR java package:

We take this JAR archive and save it in our package project WEB-INF/lib folder. We also check the composition of the file to make sure it includes all the classes we need.
This takes care of the plain webapp side of things so we move onto actually loading OSGi and what configuration it needs.
As mandated by Equinox we add a launch.ini file to clear and possibly override System properties (please see the source for details on that).
We then create an eclipse folder, which the servlet bridge expects to find the OSGi platform jar and any bundles (including ours).
We select all our project bundles, right-click and select the ‘Export…:Deployable plug-ins and fragments’ option.
This leaves us with a list of bundles that compose our custom code:
com.calidos.dani.osgi.cache.controller_1.0.0.beta.jar

com.calidos.dani.osgi.cache.frontend.http_1.0.0.beta.jar

com.calidos.dani.osgi.cache.log4jconfig_1.0.0.beta.jar

com.calidos.dani.osgi.cache.provider.memcached_1.0.0.beta.jar

com.calidos.dani.osgi.cache.provider.memory_0.0.1.dev.jar
Good, as we know, there are some standard and some special bundle dependencies we need as well. Let’s go through them by groups. We get a bunch of basic OSGi bundles we should include in most projects:
org.eclipse.equinox.registry_3.4.100.v20090520-1800.jar

org.eclipse.osgi.services_3.2.0.v20090520-1800.jar

org.eclipse.osgi.util_3.2.0.v20090520-1800.jar

org.eclipse.osgi_3.5.1.R35x_v20090827.jar
There are several options to obtain these bundles:
For expediency, we can go to our Eclipse installation folder and look for them in the ‘plugins’ subfolder. We then copy them into our package ‘plugins’ folder and there you go.
The second option is to get them from the Equinox distribution.
Another option is to the prepackaged servlet bridge feature which can be picked from CVS as well:
Method: pserver
User: anonymous
Host: dev.eclipse.org
Repository path: /cvsroot/rt
CVS Module: org.eclipse.equinox/server-side/features/org.eclipse.equinox.servletbridge.feature
Once that is loaded onto our workspace, we open the feature.xml and select the ‘Export Wizard’ form the ‘Exporting’ section. This lets us export these minimum bundles and generate both the deployment ‘feature.xml’ file as well as the bundle listing (even though the wizard actually takes them from our Eclipse platform).
We also have some more dependencies related to doing HTTP and the logging platform:
org.apache.log4j_1.2.13.v200903072027.jar

org.eclipse.equinox.common_3.5.1.R35x_v20090807-1100.jar

org.eclipse.equinox.http.registry_1.0.200.v20090520-1800.jar

org.eclipse.equinox.http.servlet_1.0.200.v20090520-1800.jar

org.eclipse.equinox.registry_3.4.100.v20090520-1800.jar
These can also be obtained from the Eclipse plugins folder or Equinox distribution folder. One should note that modifying the feature.xml taken from the Eclipse CVS repository, adding any required plugins there and then running the Export Wizard.
Finally, we have two dependencies we need to pay special attention to:
org.eclipse.equinox.http.servletbridge_1.0.200.200911180023.jar

javax.servlet_2.4.0.200911240836.jar
In the first case, it’s a special minimal bundle that hooks the plain webapp servlet bridge with the OSGi ‘org.eclipse.equinox.http.servlet’ standard component which publishes a servlet service onto the OSGi platform.
This are the details to get it from CVS:
Method: pserver
User: anonymous
Host: dev.eclipse.org
Repository path: /cvsroot/rt
CVS Module: org.eclipse.equinox/server-side/bundles/org.eclipse.equinox.http.servletbridge
We export it as a deployable plug-in and add it to the mix. We can also download it from the Equinox distribution site as well.
In the second case, this bundle contains the basic servlet classes and interfaces and I have found problems of class signatures when using 2.5 along with the servlet bridge so unless all is compiled against 2.5 the safest bet is to go with 2.4.
(Check http://www.eclipse.org/equinox/documents/quickstart.php for more info).
Next, Equinox requires an XML file to define some metadata about the loaded bundles and make our configuration easier. The file sits in a folder called ‘features’ plus a subfolder with a reverse DNS name and is called feature.xml.
The structure is quite simple (though it can be created using the Eclipse Feature Export Wizard) and mainly holds a list of plugins, their version data and some more fields:
We complete the list with all our bundles, fully knowing that we can extend our environment on the fly once it’s loaded if we need it.
Next, we create the config.ini file which really tells equinox which of the bundles stated in the feature file to start, at which start level and lets us add even more bundles (though we need to specify where the actual file is located and the full filename in that case). It also lets us configure the environment pretty thoroughly.
The resulting config.ini file looks like this:
#Eclipse Runtime Configuration File

osgi.bundles=org.eclipse.equinox.common@1:start, org.apache.log4j@start, org.eclipse.osgi.util@start, org.eclipse.osgi.services@start, org.eclipse.equinox.http.servlet@start, \

 org.eclipse.equinox.servletbridge.extensionbundle, \

 org.eclipse.equinox.http.servletbridge@start, \

 javax.servlet@start, org.eclipse.equinox.registry@start, org.eclipse.equinox.http.registry@start, org.eclipse.equinox.servletbridge.extensionbundle \

 org.eclipse.equinox.http.servlet@start, org.eclipse.equinox.common@start, com.calidos.dani.osgi.cache.log4jconfig, \

 com.calidos.dani.osgi.cache.provider.memcached@3:start, com.calidos.dani.osgi.cache.provider.memory, com.calidos.dani.osgi.cache.controller@4:start, \

 com.calidos.dani.osgi.cache.frontend.http@5:start
osgi.bundles.defaultStartLevel=4
We decide not to start the in memory bundle as it only works reliably in a single instance deployment scenario. Otherwise, in a multiple server setup the in-memory cache data would become inconsistent.
Also, be sure to check the Equinox quickstart guide and documentation for more information.
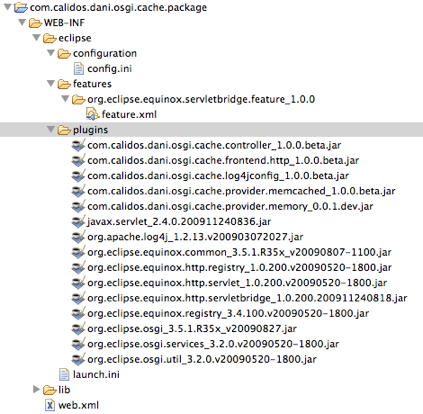
Once all is is done, the project looks like this:

Time to right-click on the project and select ‘Export:Archive file’ to save it in zip format and rename it to .war. Ready to deploy! Remember to access it using the URL /
As usual, here you can find the source and the completed WAR though they are one and the same.
La idea més absurda que he sentit últimament, de mans de News Corp i Microsoft. Arribar a un acord d’exclusivitat perque el cercador de MS Bing sigui l’únic que indexa les seves notícies.
Sense comentaris.
Welcome to the third instalment of our OSGi ABC tutorial. Please make sure you check both the 1st installment and the 2nd.
In this post, we will add another cache provider implementation to the mix as well as provide an HTTP front-end so the whole application can be tested.
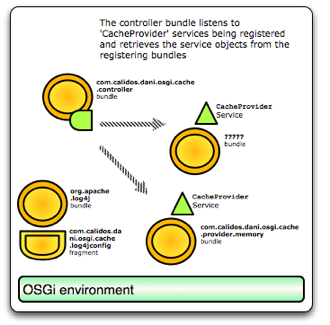
First of all, let’s present a conceptual diagram of all the bundles and fragments involved so far.

Read on for more…
Continue reading “Components on the server (3): adding a HTTP frontend”
Simplement genial…
Aquesta cançó sí que és un bon punt i final a la dècada dels 80 (l’album “Autobiografía” va sortir el 89)
Hopefully you enjoyed the OSGi journey in its first installment.
Though simple and easy to understand, the first example does nothing out of the ordinary. It is far more interesting to start exploiting some of the basic features OSGi gets us “for free”.
For instance, we could begin by moving our first basic implementation into a separate “model” bundle and enhancing the interface so it can throw exceptions. For instance, an exception can be thrown when no implementations are available or cannot be contacted/operated.
Read the rest of the post for the implementation details…
Continue reading “Components on the server (2): creating the first bundles”