The best way to start with OSGi on the server side is with a mini-project to help clarify concepts and workout the mechanics.
I have chosen a simple idea: build a volatile cache that stores objects. The interface with it is simple HTTP calls to perform usual operations: get, set, clear and get info. Additionally, Unit Testing will of course be used (but not Acceptance Testing in this case).
We start with building a component that serves as the controller for the system. It encapsulates any implementation details and answers to the system requests.
Read on for a short tutorial on how to setup the a first bundle, add an interface and some logging and fire up the appropriate OSGi environment.
Setting up the project
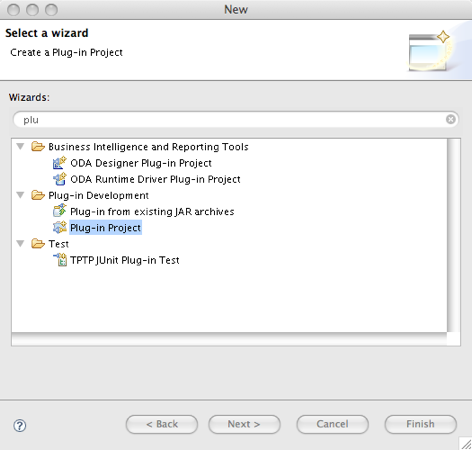
We fire up Eclipse and switch to the ‘Plug-in Development’ perspective and create a new ‘Plug-in Project’ using the Other option.

As we are bulding the main controller component for the cache, we name it appropriately e.g. ‘com.calidos.dani.osgi.cache.controller’. Remember to select Equinox as the targeted environment as well as create a Java project along with it.

Next step is to specify the plug-in basic data such as ID and minimum requested execution environment.
In this case we select Java SE 1.6 but in production we should select something lower unless there are any specific VM requirements. As this is a controller-like component it is quite likely that some sort of state activation will take place at some point so we have the wizard generate an activator class.
We unselect the template (we will not be using any) and off we go onto the next step.
Adding some logging
The first thing the wizard does after the definition is finished is present the Manifest overview screen and from there we can tweak dependencies, API exposure and any other properties of the bundle. We can also examine the default Activator java class that contains empty stub start and stop methods.
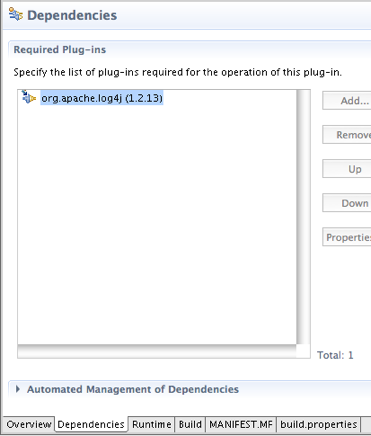
We clearly need some sort of logging so we add log4j support using the ‘dependencies’ tab.

This means that the bundle won’t load unless the official org.apache.log4j bundle is present in the environment. Additionally, we need somewhere to put the log4j configuration file. There are several alternatives for this but one I feel to be quite elegant is to create a bundle fragment to hold the configuration and attach it to wherever needed.
Using the wizard, we can create a Plug-in Fragment project named ‘com.calidos.dani.osgi.cache.log4jconfig’. In this case we don’t need to create a Java project as the fragment doesn’t have any java code. We configure the fragment to be attached to the log4j bundle. We then add our preferred log4j.properties file to the root of that fragment. To make sure we export the configuration file we select it on the ‘Build’ tab of the manifest wizard. When the fragment is loaded unto the log4j bundle, the log4j.properties file will be made visible to the bundle and configure the log4j environment accordingly.

We create the OSGi environment where we can test our bundle by selecting ‘Run:Run Configurations…’. We create a new ‘OSGi’ configuration and we name it something like ‘Basic Cache env’. One quick way to create the environment is to first deselect all bundles, look for the main bundle ID we wat to run (in this case ‘com.calidos.dani.osgi.cache.controller’) and click on ‘Add Required Bundles’. This should automagically add any required bundles you may need. Make sure the log4j fragment is also selected.
We run the ‘Basic Cache env’ and all should load appropriately. Typing ‘ss’ on the console should spit out something like:
Framework is launched.

id	State       Bundle
0	ACTIVE      org.eclipse.osgi_3.4.3.R34x_v20081215-1030
1	ACTIVE      com.calidos.dani.osgi.cache.controller_1.0.0
2	ACTIVE      org.apache.log4j_1.2.13.v200806030600
	            Fragments=4
4	RESOLVED    com.calidos.dani.osgi.cache.log4jconfig_1.0.0
	            Master=2
This is telling us we have only loaded the bundles we want and all are loaded and properly started. Note that the fragment is only ‘RESOLVED’ as it is not a full bundle in itself.
In true test-driven development style, we can write some tests first that help define the expected behaviour of the bundle. There are several options and schools of thought about how to best do this (for instance creating a separate bundle for the tests, etc.). In our case we incorporate the test in the bundle for simplicity.
We edit our MANIFEST.MF and add org.junit4 as an optional ‘Required Plug-in’ to be able to load tests. In this case then we create a separate ‘test’ java source folder for the bundle and add test cases to it. To define the test cases we need to think about the main interface of the cache.
It seems clear that we can initialize and check the status of the cache and ask how many items we have got on it. We can also clear all items present in the cache. We create the interface and an implementation stub and finally add test code. The interface looks like this:
public interface Cache {

/** Initialize with 0 elems and default starting capacity
*/
void init();

/**	Initialize the cache with zero elements
* 	@param startingCapacity hint to make room
*/
void init(int startingCapacity);

/** @return the number of objects at this time
*/
int size();

/** Clear the cache from any elements
*/
void clear();

[...]

}
Obviously all tests fail at the beginning as the default behaviour for them should be failing (and the current JUnit 4 Eclipse integration puts a ‘fail’ on each test). As it is an internal Unit test we expose the implementation on the setup test method but we actually use the interface on the tests themselves, which preserves implementation details from the tests themselves.
Selecting the test class and choosing ‘Run:Run As’ menu option we can run the tests as standalone JUnit tests or within an OSGi environment, shell included.
Here you can download an export of the project with all the source so far. Hope this is useful and complements other similar resources on the Web. The source is available in the Apache 2.0 license so enjoy.
Update: here you can find an archive with the logging configuration fragment
PS: I have an easy and straightforward method to write this post offline. I write the article on TextEdit, pasting the images as I go. This creates a .rtfd folder with the images stored in the TIFF inside. I’ve written a trivial 5-minute Automator script that turns the images into PNGs, numbers, sorts and renames the files. It is quite handy as I finally post this.
One thought on “Components on the server: an OSGi mini-project”
Comments are closed.